How to Graft Tomatoes
Views: 11835
I’m finishing my seed orders, and one thing that has to be on my list is more rootstock seeds for my tomato grafting. After mastering the technique (or calling it good enough), all of the tomatoes I grow are grafted.
How to Graft Tomatoes
Grafted tomatoes are more popular now, with good reason. You can expect 40 percent increased production, which is a big deal especially if you have limited space, and you can give heirloom and other disease susceptible varieties an added degree of protection.
Grafting Supplies
Here’s what you need to top graft your own tomatoes:
• Rootstock seeds, bred for vigorous growth and disease resistance. The one I use the most is Maxifort, although I’m experimenting with others. They’re not cheap—typically $24 for 25 seeds—but it’s worth it.
• Clips to top graft tomatoes. Go with the 2 milimeter silicon clips.
• Scion seeds. The scion is the plant you’re going to harvest. Pick your favorite variety!
• Containers, potting soil, skewers or some way to support the seedling, plastic bag, plant markers.
Starting Seeds
Start both your scion and rootstock seeds at the same time. You need the stems to be the same diameter when you attach them. Since I do a number of plants, I plant a dozen or so seeds of each in separate four-inch containers. Transplant them to individual containers once they have their first true leaves. Allow them to grow until the stem is roughly 1/16 inch in diameter. This is usually a week and a half or two weeks after transplanting.
Cutting and Grafting
I’ve used a razor or utility knife to make my cuts in the past, although there’s now a nifty new tool at Johnny’s Selected Seeds that is much, much safer. You should probably go that direction to save a sliced finger. To create your plant, simply cut off the top of the rootstock plant at roughly a 45 degree angle leaving at least ¾ inch sticking up from the soil. (It’s too hard to handle to clip together if it’s too short.) Toss the top of the rootstock plant. More than once I’ve picked it up wondering if it was something I should throw away or put on the rootstock! Cut the scion top off at the same angle.
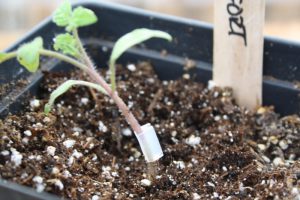
Now the fun part. Take your little silicon clip and slip it over the rootstock. Slide in the scion and match up the angles. Tada! Use a skewer (or a Popsicle stick works) to support the plant. You don’t want it to flop over and break the graft. Make sure you make a plant marker indicating the rootstock (if you’re using more than one) and the top plant variety. Water the graft, and place a plastic bag over the time to retain the moisture. I set my newly grafted plants on top of the refrigerator because it’s warm, out of the direct sunlight and out of the boys’ reach.
After a few days, you’ll have a pretty good idea if it’s going to take. If it immediately wilts, it’s not looking good. Sometimes you can readjust the graft to make it work. After about 4-5 days, I take off the plastic bag if it’s looking good. In 10 days, the graft should be sound. Don’t put the plant in direct sunlight right away, but gradually introduce it to stronger light. And always keep it well watered.
When you plant your grafted plant, be sure not to bury the grafted joint of the plant or it defeats the purpose. I know this goes against traditional tomato planting where we bury it deeply to encourage root growth, but resist the temptation. After planting, just treat it like any other tomato, but be ready to bring out the heavy duty supports and plan on a lot of tomatoes.
Meet Amy Grisak
Amy is a freelance author and photographer in Great Falls, MT who specializes in gardening, foods, and sustainable agriculture. She provides information on every kind…
Amy's Recent Posts

This Little Piggy is a Problem: Dealing with Feral Hogs

Hollow Stems for Native Bees: Leave the Garden a Little Messy
Amy's Videos
Membership Has Its Perks

- Ask The Expert Questions
- Newsletter Archive
- PlantersPlace Magazine
- Members Photo Gallery
- Product Ratings & Reviews
- Garden Club Samples
Here’s more information about gardening that you’re going to want

Watch a Gardening Video

Learn About Osmocote Products

Read a Gardening Blog